Data Protectionand Privacy Policy

Friday, 24 December 2010

Happy Christmas and a Great New Year!!

Happy Christmas everyone,
Only a few hours to go! I have finally put the last of my Christmas bits away in a box, so my craft room is now back to normal!! Even quite tidy I might ad!!!Lol!
This is an Advent Calendar I designed and did a class for, at The Craft Barn in Lingfield, where I used to be a tutor, a couple of Christmases ago.
Unlike last Christmas, which was a non event, as we were living in one room out of boxes, with building works still in full swing! This Christmas, as we have now nearly finished unpacking, we are having a proper one! I found this in a box, tucked away in the loft.
I made a more simple one this year for my Grand-daughter, out of matchboxes. This one was made with 24 individual boxes! Not many of the 12 in the class, finished it on the day!
It was a bit of fun and they just had to decorate it at home. I remember I was exhausted at the end of this class!

As we had no room for a tree last year, we have 2 this year!! And we finally have carpets on the floors, right through!!Yipee!!

So Happy and a peaceful Christmas to everyone and a great 2011. Thank you and best wishes to all of my followers,
Luv,
Carol S.xx

Wednesday, 22 December 2010

A bit of a shower!!

Good evening all,
This was another of my samples I made with the Little Claire stamp set. I love the frog having a shower!

The raindrops are a separate stamp and will be very useful to use with other stamps.
I think it would make a nice thank you card. The frog looks grateful!

I hope to have time to post once more before Christmas. I have nearly finished making my gift tags and then all my Christmas stash will be put in a box until June 2011!
Thank you for visiting my blog over the last few months. Also thanks to those who took time to leave me such lovely comments. They are all much appreciated.
Luv,
Carol S.xx

Sunday, 12 December 2010

Little Claire's 'I'll Be There For You' Stamps

Hi again,

Here are two different cards using the same set of stamps.

The white dots around the centre circle, are just dots of 'dries white' glue and when they had dried, I topped them with Star Dust Stickles. The orange ones, again are the dries white glue, but when they had dried, I coloured them with a Copics pen.
I have a few friends that love elephants, so these stamps will come in very useful, as they can be used for various occasions.

I coloured the background with Mica sprays and then it was run through the Cuttlebug for texture.

I hope you like these stamps and they are available from Little Claire now!
Thanks for looking,
Luv,
Carol S.xx

Saturday, 11 December 2010

Georgia from Little Claire Stamps.

Hi everyone,
Wow!! Posting 2 days running! Isn't she gorgeous?! I have been dying to post Georgia as she is so cute. Just added a couple of skeleton leaves I found in a drawer. They were a very strange colour, so I used some Dry Foam and added some Distress Ink to them. It worked fine.

The greeting tag is a copper garden plant tag, which I put in a Cuttlebug folder and it embossed really well.
A few gems and she is looking great! She reminds me of my 4 year old Grand-daughter, helping me in the summer to water the garden. Her watering can is exactly like Georgias'. Remember the summer? It seems a lifetime away!!Lol

Thank you for visiting my blog and for your comments, they are always enjoyed.
Luv,
Carol S.xx


Friday, 10 December 2010

A Place in the Sun

Hi everyone,
This is one of the latest Little Claire stamps, 'A Place in the Sun. I particularly like this stamp, as you can use each half of the stamp on its own. It is a big stamp and I have used the Grand Label 4 Nestie to cut out the image. I coloured the image with Distress Inks and added Glossy Accents to the window 'glass'. The large leaves are cut with the Little Claire large fern die, which I have to admit to over using. I just love it, as you can cut the leaves to what ever size you want. The flower was made from a scalloped circle Nestie, cut 3 times, sprayed with Mica sprays and cut and shaped to form the flower.
The flowers on the balcony are very delicate but still easy to colour.

This is a 'must have' stamp, as it can be used for many different occasions and also for both men and ladies.
I am sure you will really love this one as much as me!
Thanks for looking and let me know what you think of it.
Love,

Carol Sxx

Thursday, 2 December 2010

A Trunk Full Of Fun!!

Hi all,
Here are a couple more of the cards I made, with the Little Claire club members stamp set. The first one I made as a little book type of card. I cut the shaped edge with a Nesty, by putting the edge I want to cut over the blade and the rest through the die and underneath the cutting side.

The picture below is the card open. I just threaded 'rick rack' ribbon through the holes at the spine. I don't need to tell you that they are coloured with Distress inks!
The card below looks much better in real life than in this photo. Don't know why except the colours look different. Must be the blue glass in the conservatory roof again.

Thank you for taking time to visit my blog.

Luv,
Carol S.xx

An Elephant Fun Fountain!

Hi everyone,
This is one of my cards I made, with the Little Claire stamp set for club members, released today. I had to colour her pink, as she looked so cute! I put Glossy Accents and Stickles on the water spout, the water drops and the frog's puddle.
I made it into a tent card with my Joy die cutting machine. I used a Cuttle Bug die for the flowers and punched leaves. As usual, I coloured the picture and the flowers with Distress inks. I love the pink, Victorian Velvet, as it gives the effect of velvet.
Check out her toe nails!! Aged Mahogany colour!! Definately a fun Elephant and fun stamps.


Thank you for visiting my blog. Would love to read your comments.
Luv,
Carol S.xx

Sunday, 28 November 2010

Phew!! What a busy time!!

Hi everyone,
I can't believe how long it has been since I posted my last card! I have been so busy, doing sample cards and making items for my charity Christmas Fair that we did yesterday.
It went quite well considering the climate at the moment. I have another fair to do next Saturday afternoon, which will be the last one this year.
I actually made this card a few weeks ago but forgot to take a picture of it. It is from a set of Kanban stamps. The dog is so big and floppy, you would just want to cuddle him.

I coloured it with Distress Inks as normal for me.Lol!

And guess what, I added just a little Stickles on her dress and Glossy Accents on eyes and the dog's noses!
Let me know if you like it!

I now must make a birthday card for my Daughter for Tuesday and for my Son whose birthday is on Saturday! Then I must get my Christmas cards made! I usually post my christmas cards the first week in December. I will be a bit late this year!

Thanks for looking.

Luv,
Carol S. xx

Wednesday, 17 November 2010

An Old Favourite!

Hi everyone,
I have had a horrible 3 weeks, with a nasty flu type virus. It left me with an infection, so now on antibiotics but at last, I am feeling I am on the mend. In the middle of having that, my husband went into hospital for an operation on his knee. So not a lot of fun in our house for a few weeks.
I still love this lovely old Santa stamp. I thought I would just do him on white card for a change and layer, white on white. Just added a bit of colour to his face, Glossy Accents on his glasses and eyes. Of course, Stickles on his hat and beard.
I love the way he looks at you!
The picture below was taken in my conservatory, where I usually take my photos, as the light is much better out there. It has blue tinted glass in the roof and I don't know why, it seemed to turn only this card blue!! Spooky I think! The picture above was taken in my craft room when the light was fading and came out with the correct colour. Very odd!!Lol
I must start making our Christmas cards for our family and friends soon! I also have both my Daughter and Son's birthdays in the next couple of weeks. A few more late nights to come.Lol
Thank you for visiting my blog,
Luv,
Carol Sxx


Friday, 5 November 2010

Little Angel!

Hi everyone,

This Lilli of the Valley angel is adorable. The base card I have cut as a fold back popout, cut with my Joy Trouvaille machine.

My usual Distress inks were used to colour the image of course. Stickles Star Dust just touched here and there as a highlight.
The snowflakes and stars are cut with a Cuttlebug die, yes I still use my 'Bug' for little jobs!


One thing I did use my Joy machine for today, was to emboss a whole A4 sheet of paper with the Cuttlebug snowflake folder. Very useful to have a whole sheet of backing paper.
I am getting a set of Grand dies tomorrow, can't wait to have a play!
My cold has finally got to me so I am having an early night.
Luv,
Carol S. xx

Thursday, 4 November 2010

An Inky Fingers Project!

Morning all,

A bit of grunge board (I wish it did't smell so much!). I love to play with the Cosmic Shimmer mist sprays. The effect is so pretty and always different.
The masks and stamps are from Creative Expressions. The embossing folders are also from Creative Expressions and will be available from Crafty Ideas by Kaz.
Sometimes it is just fun to get messy! Especially when you get a nice result.

Hope this will inspire you to get messy! Lol!

Thanks for visiting my blog,
Luv,
Carol S.xx

Monday, 1 November 2010

A Little Birdie From Little Claire!

Hi again,

I can't believe it, 2 posts in one day!! I just could not wait to post these cards, as this stamp from Little Claire, has to be by most favourite to date! She is cute but not overly and she will be great all year round. This first one is very autumnal and ideal, as I look out my window at the trees. The background is white card coloured with distress inks and put through the Cuttlebug in the swirls folder.

On the white edging of her coat, I used 'Dries White' glue, with white flock, mixed with Crystal ultra fine glitter.
Just to show the versatility of this stamp, I coloured her with Christmas colours but still as a birthday card. Ideal for a December birthday. I cut the card shape in my Joy machine.

This time for the edging of her coat, I still used the Dries White glue but just used crystal glitter straight onto the glue. If you use a thick, good quality glue, it will dry with dimension, which adds texture to the image. Her coat etc was coloured with Distress inks.


Thank you for visiting my blog and feel free to leave a comment if you like these cards.
Luv,
Carol S.xx

The Joy Trouvaille

Good afternoon all,


This is my new toy, the Joy Trouvaille. It takes A4 sheets of card etc, so you can now cut apertures in A4 card, without having to play around with odd bits of card shims, to try and stop marking the other half of the card stock.

I have taken photos of step by step, cutting an easel card with a large Nestabilities die. The first photo is the actual machine. It is very simple to use and very easy to wind the plates through.


In the photo below, I have folded an A4 card in half and also on the gate fold line for the front, then opened the card again, laying the card down, with the right side up. Using low tack masking tape to hold the die in place, I placed it centrally across the gate fold line. (You can turn the die length ways, still centrally across the gate fold line and this will cut a fold back pop out.)


The next photo shows the most important stage, the placing of the top plate. Once you have secured your die in place, turn the card and die over, so the cutting blade is facing up and place onto the base plate. The top plate is now put down onto the card, only up to the gate fold score line, so only half of the die is under the plate. You can just see the top of the die peeping out of the card.


The next photo shows the sandwich placed on the tray of the machine. Carefully place the sandwich on the machine so as not to move the position of the top plate, turning it around, so that the end where the die is, goes through the machine last. Wind through the machine.


The next photo shows the completed card with other sizes of the Nestie, matted onto the card base.

The Wine Country labels are also from a set of Nesties I bought a couple of years ago. The Happy Birthday is a copper garden plant label that I placed in a Cuttlebug folder and ran it through my 'Bug'.


I am pleased to say my Son-in-law liked his card and also the vintage bottle of wine that went with it!!

I hope you will have a go with this technique and I highly reccomend the Joy machine, which I bought from Crafty Ideas by Kaz.

Thanks for visiting,

Luv,

Carol Sxx


Wednesday, 27 October 2010

Little Claire's Christmas Giraffe.

Hi everyone,

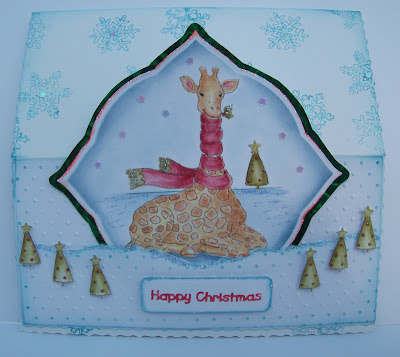
I wondered why I couldn't find my giraffe card, I had forgotten to post it! I took the original to Alexandra Palace and gave it to Steve. Also met Heidi who was doing some lovely demo cards.
I made it into an easel card. Below is the front closed image. I love the little Christmas tree in the background. So I stamped it a few times, cut them out and attached them with foam pads.

This photo is the card open. I am afraid I have painted with Distress inks again. I can't help it, because I love the finish you get with the inks. They are so easy to use, easy to blend, great range of colours and you can mix them to make even more colours. If you go over the stamped line, you can easily lift off the ink with a wet brush.
I couldn't decide if the Giraffe was a boy or a girl! Thought I would be safe with a red scarf!! Lol.

Thank you for visiting my blog and I hope you liked what you saw.
Love,
Carol S.xx

Christmas Is Coming!

Hi everyone,
I have had a few mad days and I am absolutely shattered! Monday was the worse, as had husband home on a long weekend and we had our 4 year old grand-daughter for the day. We spent the morning in a craft shop buying Halloween things, including a large pumpkin to paint. We also had to make a birthday card for her Daddy, as his birthday is on Halloween. We had a 'picnic lunch' on a rug on the floor of the sitting room! Took me half an hour to get up again!!

This card I made, using my favourite Whiff of Joy stamp from last Christmas. I also used her throughout the year, just cut off the lantern. She is stamped with Smokey Grey Versafine and coloured with Distress Inks. Are you surprised?!!Lol!
The leaves are punched and the flower is a Marianne Creatables die I bought from Crafty Ideas. I edged each piece of card with Aged Mahogany distress ink and then put Star Dust Stickles over it. Also around the flower and her dress and lantern.

I would like to have made this card for my family and friends for Christmas, as I really enjoy painting her but it would take far too long! I think it will have to be the Little Claire Polar Bears looking at the star and the child standing on the presents, dressing the tree. Much quicker to do when you have so many! And they are very nice stamps.
Well I am off to bed, as I spent the day sorting out my craft room. Found lots of things I had 'lost' including my pokey tool. I had lost it for so long, I bought a replacement.Lol!!
Good night,
Luv,
CarolSxx


Wednesday, 20 October 2010

My New Toy!

Hi All,
At last, this is my first card I made with the Joy! Trouvaille Die Cutting machine. It is an A4 card that I cut a half pop out front, with the card blank open. Not the easiest card to photograph for you to see the pop out piece! I will never win prizes for taking photos! I scored the front section of the card in half and laid the die, cutting side down, with the middle of the die in line with the score line. I taped it in place with low tack masking tape, turned it over so the cutting side was up. I then placed the plate only up to the score line, therefore only half of the die is under the plate. I ran it through the machine (very smooth action), and just the half of the front I wanted cut, was!! Yippee!!
I will take photos of the stages as it is not the easiest method to explain. The other good thing with this machine, is that the Indentz embossing folders will go through sideways, which they don't in the Cuttlebug, so I can make large pieces of embossed card. Also apertures can be cut in A4 card without having to fold the card.
The stamp was a Kanban fairy, very cute. Coloured with distress inks.
I am looking forward to having a bit more play time, hopefully next week.

Supposed to be having fitted wardrobes put in tomorrow or Friday. Can't wait to have some storage space. Its only been a year of waiting but seems more like 5 years! I would just like to get one room completely finished. As the decorating is down to me to do, crafting does sometimes get in the way a bit. Lol! I keep telling myself it is like crafting, just on a bigger scale!
Thank you for visiting my blog,
Carol S.xx

Monday, 18 October 2010

Our Charity Craft Fair.

Hi everyone,
I am so sorry with not reporting on my new Joy Die Cutting machine. We got rather tied up with organising and making items for our Charity Craft Fair. I promise I will do my next blog on the machine, complete with photos!

These are a few photos of the things we made, even the clocks! We held the sale in my conservatory. Thank goodness we had a big one built!! We did quite well on the day and have another 2 sales booked. The charity is the Stildon Brendoncare Foundation in East Grinstead, which I have supported for nearly 5 years. They look after elderly people in a beautiful, purpose built building, with full nursing facilities, along side residential apartments for those who can still look after themselves. The staff are wonderful, arranging lots of entertainment days and even had Christmas in June, complete with Christmas dinner!!
The wine in the rack in this picture was not for sale, just the items on top!!


We sold most of our desk calendars and even had a couple of orders. The table in this picture looked a bit different at the end of the day! Not quite so full!! Which was the whole idea after all.

We are looking forward to the next event so we can raise even more money, as even the charities are finding it hard at the moment.
Thank you for visiting my blog and leaving your comments. Also a special thanks to Mary, who often leaves a lovely comment.
CarolSxx