Data Protectionand Privacy Policy

Showing posts with label Anything but a card project. Show all posts

Monday, 11 September 2017

From this!!

What a busy week we had last week!! Non stop every day.
Ending on Sunday, meeting friends at Thetford Craft show.
We really enjoyed the day.

One of my friends came up here for my birthday and brought
bags of craft goodies for me. She is a lovely lady and a special friend. 

In one bag, there was mount board pieces she had die cut for me.

I worked out how to put it together and then decided 
what I was going to make it into.


To this!!!

So this is the idea that I had in my head!!
A Fairy House.

A couple of weeks ago, we had been driftwood collecting, 
on the beach that we can walk to from our house.

I had wanted to do something like this.


I enjoyed every minute of the hours it took to finish it!!
I wanted to get the detail right.

I made the fence posts on both sides, with small driftwood bits and 
wired them together.


Just a close up of my working bell and the fence.


For the top roof ridge tile, I made it from a scrap of card.


The roof opens and looks sweet with a battery T light inside. 
I cut the rustic window out and backed it with a piece of acetate.


So now I have finished it, my husband doesn't want me to sell it!

I have got the pieces to make another one, so I will get it made.

My friend Marianne's husband asked me what I was doing 
with driftwood. So Graham, this is it!!

Thanks for visiting my blog and hope to see you again.
Please leave me a message so I know you have been. 

Big hugs,
Carol
xxxx


Friday, 11 August 2017

By The Seaside

I wanted to make some different things for my Craft Faye stall.
So I thought I'd have a go using a box frame.
I did my shabby chic techie on it, as it was dark brown.

Whoops!!
Just noticed, because of the glass, you can see on the left 
of the pictures, the outline of my hand and head!!

I used water colour card for the background and painted 
the scene with Distress Inks.


I used some white acrylic paint for the spray.
Sticks and moss from my stash and shells from Spain.
The anchor was a free die from a magazine, as was the rope stamp.


I made one of these a couple of weeks ago.
I took it to my monthly Craft Fayre at The Cliff Hotel
and sold it!!
I hadn't even taken a picture of it!
So I thought I would make another one.
I only bought 2 frames, so this will be my last one for now.
Really enjoyed making it for a change.

Thanks for stopping by and the sun has come today.
Yippee!! Beautiful clear blue sky and no wind....weather wind!!

Would love a message from you, so I know you have been.
Then I will have a link to your blog too.

Big hugs,
Carol
xxxx


Friday, 19 June 2015

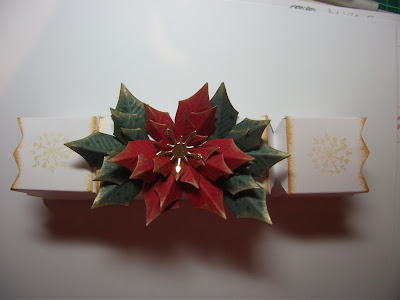
It's A Cracker!!

Anything But A Card!!
 
That's the theme, for our Winter Wonderland challenge this week.
 
I chose to make a Cracker, as they are a popular item at Christmas Fairs.
 
They are not a quick make but well worth the effort.
Of course, they do now have a die but I cut this from my own paper template.
The Poinsettia is an old Spellbinders die.
 
 
Our Sponsor for this week is
 
 
and the prize for the winner is a £10 Voucher.
 
So get making your items that we will enjoy viewing.
For more inspiration, pop over to see the gorgeous items,
that the talented Teamies have made to inspire you.
 
Thanks for visiting my blog and leaving
me such lovely messages.
Hugs,
Carol xx

Saturday, 11 October 2014

Let It Snow Even More!!

Hi everyone and a special welcome to my new followers.
Please grab a coffee or tea, even better, a glass of something stronger! You might need it!
I am afraid this is a bit of a photo shoot, so I apologise in advance.
 
Firstly I have been bursting to tell you some news.
Are you sitting comfortably - then I will begin!
 
In a garden centre about 5 minutes from here, we had a Hobbycraft Store. Not a huge one but great if you wanted something quick. The big store is about a 25 minute drive, depending on the traffic, could be even longer. The staff were very friendly and one of them, I had known for a number of  years.
Hobbycraft, then out of the blue, decided to close it.
As a support to the staff and local crafters, who couldn't get to the big store, I decided to email the CEO. No mucking about, go straight to the top!
I didn't expect a reply and even stated this in my mail.
Well I got a reply, straight away!
 
I will cut it short now. The outcome was, the CEO, Catriona Marshall, asked to meet me for a chat.
We arranged a date and met up with her and a guy called Bruce Gibson. 
I explained, as in my email, that due to public transport here, that she had now cut off many people access to craft  products. People in the villages without cars, would find it impossible to get to the big store. Not just older people but Mums with young children too. Also, as I buy in bulk, canvases, boxes etc. if I didn't have a car, there was no way I could get there and back on public transport. It takes 2 buses and about 1 1/2 hours just to get there. Then the same home, fully loaded! It would also put the price up for my market sales and that is for the charity I support.
Our meeting lasted 2 hours and unfortunately, as she explained there was no choice, the store is closed.
It is a shame, but Catriona and Bruce were very nice and seemed to take on board my comments re the stores. One of them they agreed with and said it was already being gradually implemented in all stores.
 
I am still getting people moaning to me about the closure.
I have been very lucky, as they have made me their first public Discount Card holder. I was very chuffed and it will certainly help to offsetting petrol expenses.
Sadly, it doesn't help other people.
 
Right, now to the photo shoot! I bought this pack of letters at Ally Pally from the MDF man.
 
Sorry the first photo image is a bit p... sorry, wonky! Hubby was behind the door holding the cord!


At first I didn't know how to decorate them and then I had a moment!
You know, the wave comes over you!


I had bought some Decorators Caulk ( a type of wall filler) in Aldi, so I decided to apply it in waves like snow drifts. I let it dry overnight and then covered it with white acrylic paint.
The first snowman is an old Whiff Of Joy stamp and a favourite of mine. I love snowmen but they have to be special looking!


The snowflakes are a mix of different makes put together. Spellbinders and Marianne Creatables.
They have been glittered with Stickles, Star Dust. 


The snowman, as all of them, have been coloured with Distress Inks. Then glittered to look like snow, with Dries white Cosmic Shimmer glue and sprinkled with CS Iced Snow glitter. 
All bought from The Craft Barn


This snowman is a Lili Of The Valley stamp, called Seeds and Greetings.


Isn't he gorgeously cute?!


Another LOTV stamp called Penguin Friends.


Meet Mr Snowman, an old LOTV stamp and another old favourite!


Wakey Wakey!!! Are you still with me? It's over now and I promise my next post
will be short and sweet.
 
Have a lovely Sunday and thanks for stopping by and leaving me such gorgeous comments. They always make me smile and encourage me to keep crafting.

Challenge
Lili Of The Valley - Anything goes
 
Hugs,
Carolxxxx

Monday, 10 October 2011

Another Buddha Nut

Hi everyone,

Christmas is really coming nearer now. I think the warm weather is making it more difficult for me to get into it.

This is the second of the three Buddha Nuts I bought. A Nativity scene with a twist. The Nativity scene is a Jenny Mayes, Hobby Art stamp, which I bought at the Craft Barn in Lingfield.


The berries and greenery are from a very old stash of mine, along with the straw, cut from odd bits of Raffia.
The 'snow' is Cosmic Shimmer dries white glue, white flock mixed with Art Glitter, Crystal and sprinkled over the glue. I also dotted Star Dust Stickles onto the greenery. The stars I cut from scraps of Mirri Board using a Cuttlebug die.

Hope you like my nut!Lol!! It was great fun to make and just a bit different. Another item for my sale on Saturday.
Thanks for popping over to my blog and come back soon, as I have also made some more cards.
Luv,

Carol S. xx

Monday, 19 September 2011

A Heart Full Of Daisies

Hi Everyone,


I have now got my craft room pretty well organised. The trouble is, I now have more space to spread out even more things!Lol!! As I look over to my craft area from my computer area, I can see very little space without anything on!!

This is a little box that I had half made many months ago. It has been moved around my room so many times that all the pieces were not together. I managed to find them all and get them in one bag, when my room was being done. I then told myself I just had to do something with it, other than find a new home to store it!

The lid top and the base were all cut with the largest scalloped heart Nestie. The internal heart shapes were cut with the large plain heart. The sides were just long strips of card, scored 1cm from one edge, then folded on the score line. Triangle pieces were cut out of the 1cm section to the score line, every 1" to allow it to be bent around the curves.

As you can see I used the Fusion method of painting the Daisies on the top of the box. It was first painted with Ivory Emulsion paint and edged with Faded Jeans Distress Ink.

The Dragonfly is stamped and embossed with white onto Vellum. Oh! Of course a touch of Stickles on the flower centres.

It would make a nice little trinket or gift box.


Hope you like my box and thank you for stopping by. I love all you special comments and they are much appreciated.
Nighty night,

Hugs,

Carol S.xx

Tuesday, 13 September 2011

Butterflies Galore

Hi everyone,

I haven't posted for a bit, as my craft room has been undergoing a complete refurb. I emptied the room last Thursday, including my computer. I was shocked with the amount of stuff I have!Lol!! Well I pretended to be shocked!! I was able to stroke things I had forgotten I had.

The fitters started at 9am on Friday and they were finished by 2.30pm. The transformation is amazing. However, it took me 3 days to get everything back in the room. I labelled most things but still have a few boxes to do.

This mirror is for a neighbour. She saw my Fairy mirror and asked me to make a butterfly one, for her Grand-daughter's 5th birthday. She can never find anything with her name on, so wanted it on as well.


Her favourite colours are pink and purple. Do you think I filled my brief?!


I used a combination of different techniques. A crackle background with Acrylic paints, PVA and Emulsion Paint. Paint Fusion with the Ivy and the Lavender. Stamped Butterflies coloured with Distress Inks.


The flower is a Nestie paper circle, cut into a spiral, screwed up and rolled around on itself. I squashed it and glued it as I rolled my way to the end and stuck it to a piece of green florist wire.

The letters are chipboard ones from my stash and coloured with Copics. I then inked them with Versamark and embossed them with clear embossing powder. I did this twice to get a smooth finish.

The grasses at the bottom, I painted with Acrylic paint. I found some silk grasses when I cleared my room. I cut some into different lengths and stuck them over the painted ones. This gave a bit of depth to the background.
The Butterflies had a bit of Stickles on their wings and bodies.


Hopefully she will like it.
I must now make some more Christmas cards. I have so many different things to make, I get a bit distracted! Not hard really!!
Thanks for visiting and your lovely comments brighten my days. Always appreciated.
Luv
,

Carol S.xx