Data Protectionand Privacy Policy

Showing posts with label Gesso. Show all posts

Wednesday, 8 September 2021

A Christmas Scene

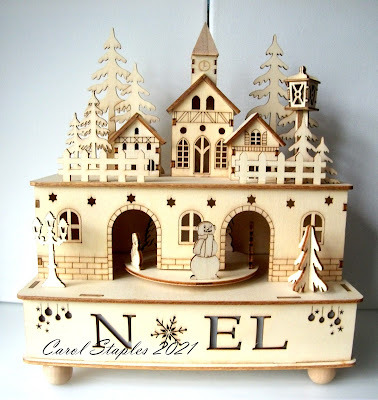
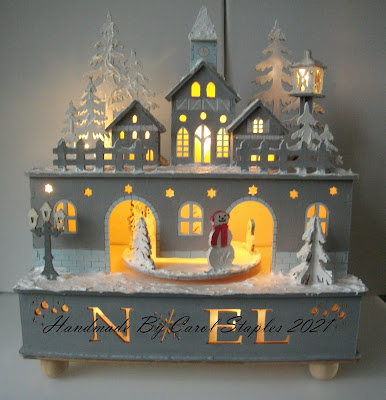
Well this has taken 5 days to do!!
From this photo, a wooden village scene, that I 
bought 2 Christmases ago from Hobbycraft,
to the photos below!!


I painted it with Gesso first and had to leave it to dry.
Then I did one coat of grey Acrylic paint where I wanted it
 and had to leave that to dry.
I then painted parts of the windows, brickwork and 
part of the church. with Paper Artsy Chalk Acrylic paint
colour Antarctic.
Then had to let it dry!!


Then I decided the grey was too dark. So I painted over it 
with a lighter shade. That needed two coats and of course,
drying time between coats!!


Then a second coat of the Antarctic paint. 
Then some gold paint
on the clock face and the lanterns.
I used a spatula to spread some white paste, onto 
the 'floors', the roofs and trees, as snow and 
topped it with some glitter.
Put the batteries in and turned the lights on and then
turned the key for the Christmas song played 
and the centre piece rotating!!

Phew!! Hope you are still awake!! 
Sold it straight away, when I sent a text 
 photo of it to friends and family. 
 

So I will be delivering it to it's new owner soon.
 
Hope you have enjoyed the few beautiful days
we have had this week.
Thank you for your lovely messages on
my last post, also the ideas for whiskers for
my dogs and cats!! I have used Pauline's at
Crafting at Cotnob idea first. 
I used to make jewellery and had a rummage and
found a whole real of beading thread!! 
It worked out fine, as I could also make it 
black using a Permanent Marker Pen.
So thank you for all your ideas and will try 
out the others too.
Stay safe.
Big hugs,
Carol
xxxx

Monday, 10 August 2020

Clay Flowers Frame

Thank you all for the lovely messages on my last post. 
Also to my 2 new visitors, I hope you liked my blog. 

I love making flowers with my Air Dry Clay and Roses 
are a regular make. So for a change, I thought I would
 try to make a Calla Lily and a Camellia.
I do have some in my garden, so I went and had look
at them to make sure I could get the detail right. Ish!!

The frame was an old one that I recycled, painting it
with some Gesso first. I then topped it with some
Duck Egg Blue Emulsion paint.  
I dried the paint with my heat gun.
I then dry bushed some craft glue over the whole frame.
I then dried to glue off a bit with my gun.

 I then dry brushed white Emulsion over the whole frame,
covering the glue.
I then dried the whole frame with my heat gun, which
then created the paint on the top to crackle. 


Below is the top corner with 2 clay flowers and the 
white flowers are from Hobbycraft. 


The pretty paper in the frame is from my stash.
So the flowers below are a Rose, Calla Lily and 
a Camelia. 

I don't use Moulds for making most of my flowers.
I prefer to just make them in my hands. 
With petals it works, as they mostly have veins
on them, which they can pick up from your hands.


So I have made a gift box to put this in and it will
go up for sale soon!!

Hope you are all enjoying the sunshine and keeping safe.
I can't remember when we last saw any rain!!
Thank goodness we have 2 big water butts for my new plants.

Thank you for taking time out to visit my blog
and I love reading your lovely messages. 

Big hugs, 
Carol 
xxxx

Sunday, 23 February 2020

Butterfly Tick Tock!!

 Hope you are all safe and dry with this dreadful weather
we seem to be having, over the whole of the country.
💧💧💧💧💧💧💧💧💧💧
I think we have been lucky here in Suffolk. 
We have just had a small pool of water in one flower bed 
in the back garden. Also my Obelisk was leaning a bit,
but all the Honeysuckle growing up it, stopped
it from going right over. 

We have our first Craft Fayre this year on 
Tuesday 3rd March. So I have been busy 
making new items for my stall.

This is one of the items.

I have one of these clocks in my Craftroom.
It was a class I did for The Craft Barn in Surrey.
Mmmmmm!!! A few years ago!!!!😄


The roof is decorated too but the photo is rubbish!!

It does have a back, so you can't see the clock mechanism.
It was just an idea I had for my monthly class,
as they wanted to make a clock. The class was
a full day, as they have to prep the pieces of the box.

I had cut all the pieces (and there are a lot of pieces!!)
 but they had to Gesso and
paint them with the colours they wanted. 
Then to add the texture using stencils.

Fortunately I had my instructions still, that I had written
up, as I was making the original.

Off to my desk again. as I have another project to get on with.

Thanks for your lovely messages on my last post.
Also for taking the time again, to pop into my 
little corner of Suffolk. The messages you leave
  are so appreciated and enjoyed. 
I will also visit your blog and leave messages for you too.

Big hugs,
Carol 
xxxx